
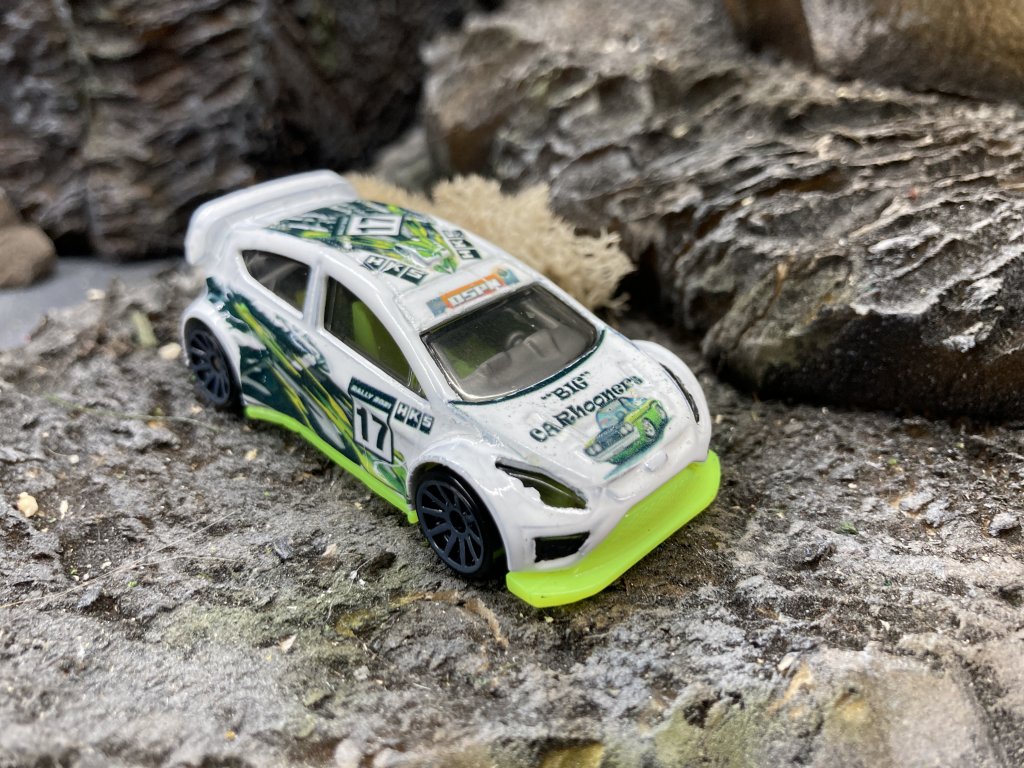
Waterslide decals are the devil
Why?How?
They seem like they'd be a medium challenge, but they're not. Getting them to print nicely on the paper is one thing, THEN making them look nice on a car is a whole nother set of problems. Gotta make sure it's a light enough color so it they can show up, or they won't.
The transfer portion seems like performing miniscule surgery. And may the customizing gods have mercy if you push too hard... with a wet cotton swab, cause there goes that decal.
Just my mini rant about trying to make my cars look good for the cameras. And I'm not starting in on my paint skill, or lack there of... Lol

Discussion
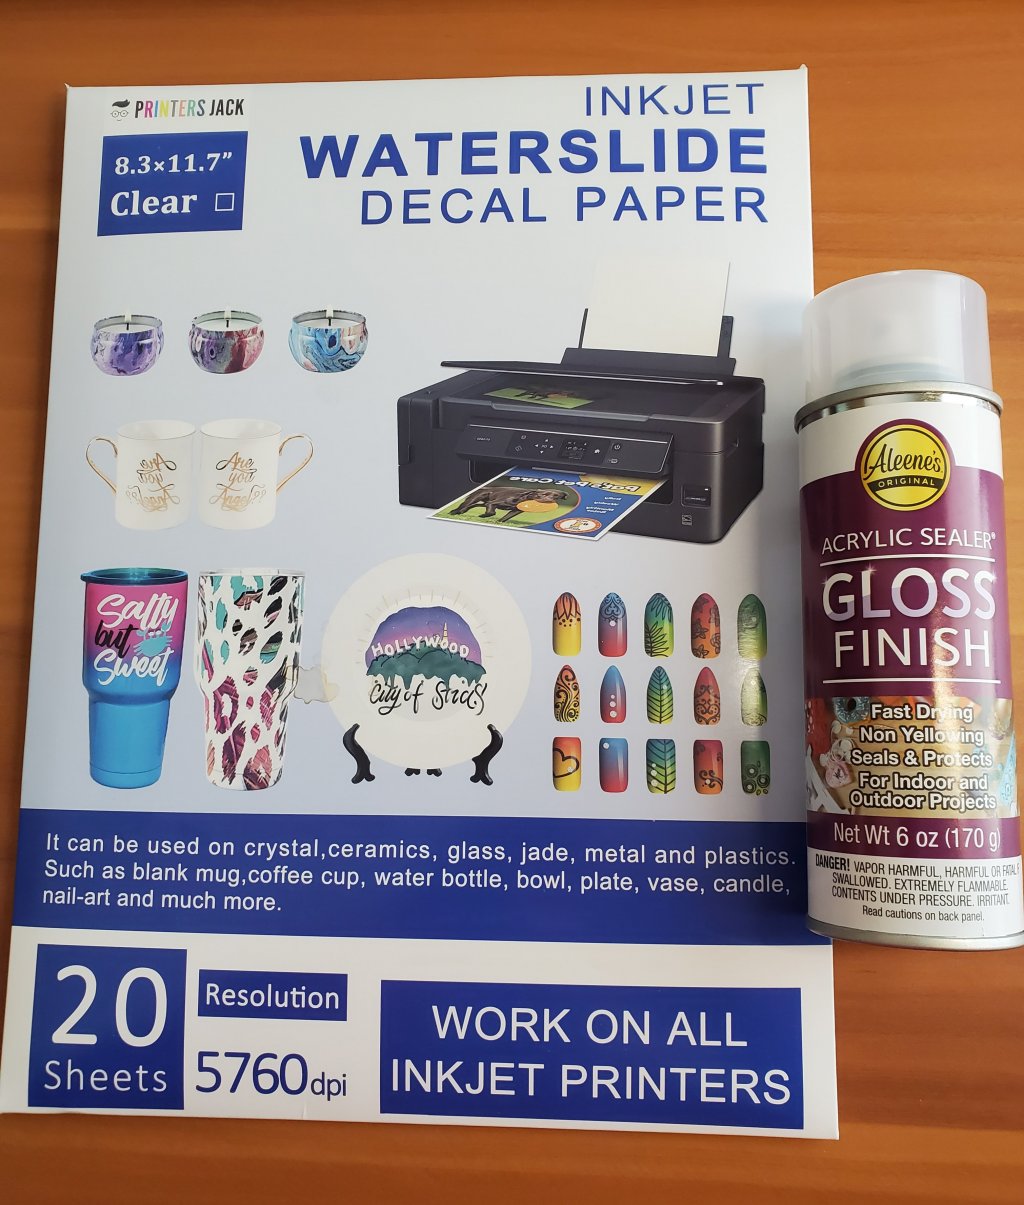
Sounds like you are doing inkjet. I have trouble with them coming apart if I don't get a good coating of acrylic clear coat on them. I do three light coats several minutes apart.
It is a bit of a dark art. I always print extras so I can start over if one goes south.
In general, waterslide decals look better on light backgrounds than they do on dark backgrounds. Some manufacturers will even send "blank" backgrounds in white for you to place on the car first, then put your other waterslide on top of it so the colors will pop like they are supposed to.
I tried once to print waterslide decals with an inkjet and gave up quickly. This was many years ago and I admittedly had a pretty shit printer. I must have printed out 3 or 4 sheets before I got one that was decent. Then the clearcoat and everything else...it's why I eventually decided to just have someone else print logo decals for me.
Although, if you're not trying to print custom logo stuff and just want some cool decals for your car, check out MyCustomHotWheels who sells a TON of great themed decal sheets for a good price.
Cutting and applying the decals never bothered me. I find that fairly straight forward but it's not something you should rush. The MCHW site has a great set of instructions for applying decals, might be worth a review too if you're having trouble.
Your article title cracks me up! Lol!
I just started printing my own waterslide decals and have only done four cars so far. It has definitely been very tedious and frustrating at times. I will NOT be using them with every car.
After some trial & error, this is what I've done with the best results: After printing, I did four medium coats of acrylic sealer about an hour or so apart. Then waited a few days before applying them. I also gave the car a light coating of the sealer before applying the decals which helped the decal stick much better and faster. After putting the decals on, I let it dry for 24hrs and gave the car three more coats of sealer. DON'T touch the car for at least 24 hrs! Let it sit and dry for 2-3 days if you can. Your oily fingers will leave a print! And don't add graphite after this! You may get some of it on your perfectly finished car. :(

- LOL, I like that the paper has a resolution — redlinederby
- The title reflects my state of mind at the time, lol! — RaSungod
Is you want them to show up on dark colors, you really need them to be White Toner decals, which some people out offer on ebay and Etsy. A White Toner Laser Printer costs a lot of money, so doing it yourself can be expensive, at least as a start up cost. Had I the chance to do it all again, I would have used my first stimulus check to buy a white toner printer so I could make them myself and start a biz printing them for others. Ah, well.
- That would be cool! I may try using white waterslide decal paper in the future. I've just read that it's trickier because you need to trim the graphic perfectly to make it look good. — G4DiecastRacing
I've just started doing almost full decal wraps - previously I would just use bits cut out - this gives it's own challenges but I loved how they turned out. To set the files for printing, I take a photo of the cars, then scale them to exact size in illustrator and use a clipping mask to act as the cutout of the shape of the car - this makes applying much easier as things like wheel wells etc are cut out before applying, so the decal is more pliable and easier to apply.
For these ones, they were printed onto white decal paper, sprayed soon after they were printed with a standard rattle can clear. Then they were all cut to shape on my cricut cutter after a few hours (made the job much easier than doing them all by hand but comes with it's own challenges) and then applied straight after.
Due to the print colour not matching the car colour that well, I ended up hand paiting in around the edge of the decals in the car colour and that blended them in much better.

This one was done via the same process but the car was white and the decal was clear
- I was wondering how the heck you did the awesome decals on those cars. But that makes total sense now. Amazing work! Thanks for sharing this tip! — G4DiecastRacing
- I contacted a real car wrap place a long time ago asking if they could make vinyl wraps small enough for a car. Thought it would be a quick/easy way to make club cars with a RLD full wrap. Sadly, they said they couldn't...but I should probably ask around again, the tech might be better now for smaller items. — redlinederby
- You can do full vinyl wraps by way of printing a Vynil 3x2 sticker and stretching it out over the car. Vynil is thicker than waterslide, though. I've been doing waterslide wraps for a while. Sent one to Warwick back in December. They are easier than one might expect. I find creating them quite rewarding. And, sometimes, they are far less frustrating to put on than separately pieced decals. — GenX_VintageRacing
- Cool, now I just need a printer! Or someplace I can send a design and buy it. — redlinederby
- I wouldn't recommend sign vinyl, I used to sell it and wrap full size cars. I did wrap a 1/18 scale car and it was a nightmare. So many small areas to get into etc. Waterslide is way easier, but I applied the same large scale principles of getting rid of the excess material from places like wheel wells, windows etc, as that extra bulk just makes it more difficult and won't allow the decal to stretch into place as nicely or as easily as when you remove it. Also much easier to do that step when the decal is dry, before applying, than trying to trim it while it's wet etc. Made that mistake on the first one, wouldn't do it again unless it's an emergency — Chaos_Canyon
- I wonder how well hydro dipping would work out on a car. I think the challenge might be finding a pattern in a small enough scale. Solid colors might turn out well though. — johnson9195
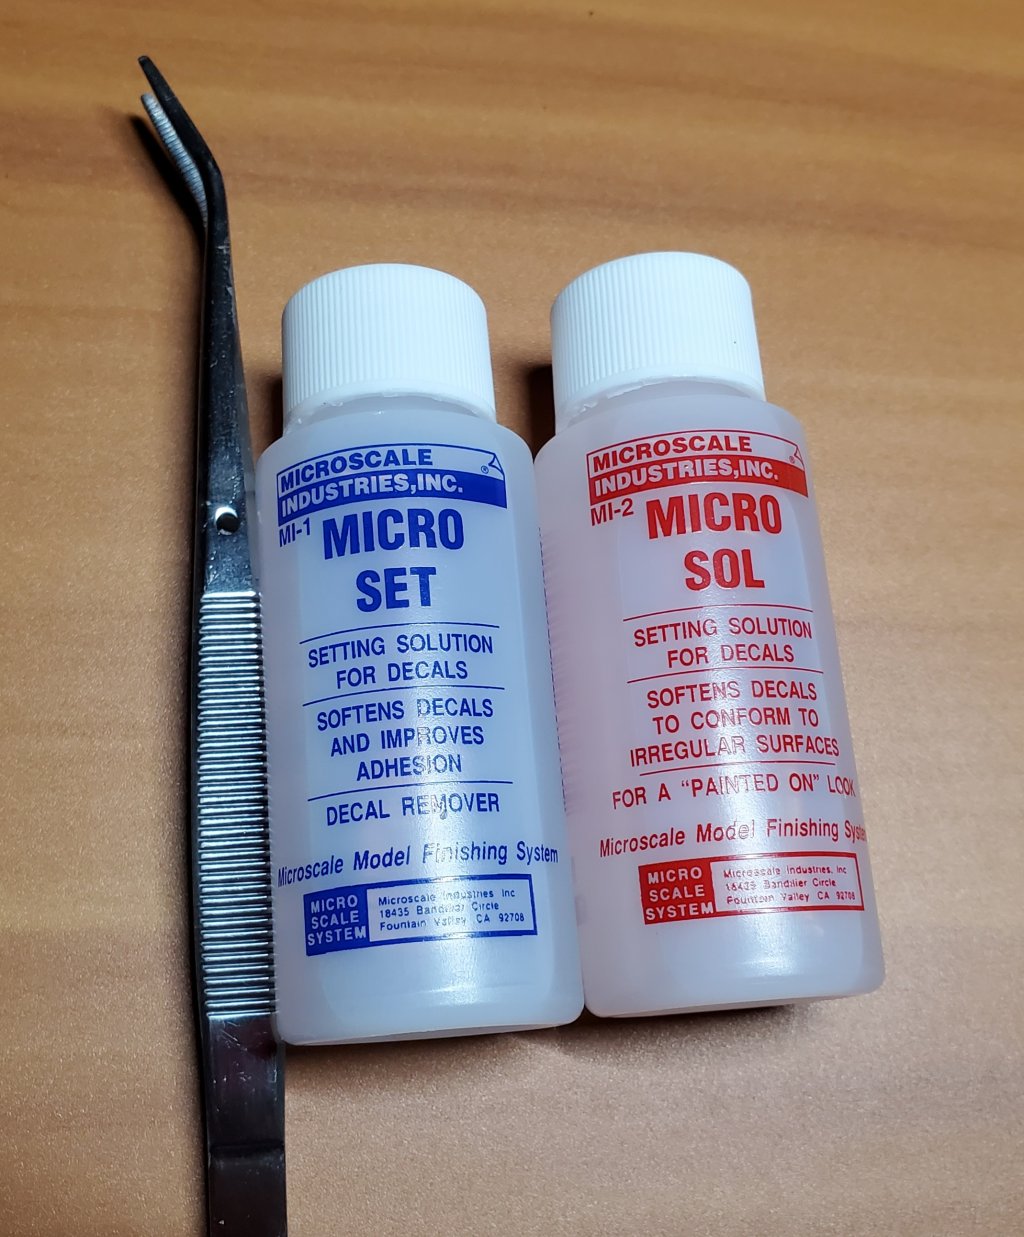
I've learned a lot about decals the hard way, so I'll pass on a few tips that might help. I apologize in advance if you know these already. First, I prep the location of the decal with MicroSet and only dip the decal into water long enough to wet it, then move it to the general location I want it and let the film loosen. Sometimes a small bead of water on the decal surface helps. Once the decal is loose, I tease it into position with a small paintbrush, then use the corner of a tissue to wick away the water: I don't press down on the decal. If I need to re-position, I rewet the decal, use the paintbrush again...or very rarely a sewing needle...until I'm 100% satisfied with the location. After wicking away the water again, I let the decal sit for a bit longer and only then do I GENTLY apply pressure to it with a Qtip or piece of tissue in a gentle roling motion. So, the decal is essentially still floating until this last step.
Second, I always use decal solutions (MicroSet, MicroSol), and sometimes find that multiple applications of MicroSol are required to get smaller decals to behave. That especially holds true with decals I do on my laser printer, as the backing on blank decal sheets seems to be thicker than commercially printed decals (to me at least). I pop any bubbles or remaining wrinkles with the needle, and then re-apply MicroSol.
Third and finally, I always make sure that the model has a good gloss coat (thoroughly cured!) on it prior to decalling, and then I apply another gloss coat over the decals once they are thoroughly dry.
I hope some of this helps!
-UB
- This is as close to my method as possible. MicroSet and MicroSol make life so much better, and the decals look so much better, too. — GenX_VintageRacing
- I'm pretty convinced that MicroSet is just diluted white vinegar. At some point, I need to have Ali run some tests on it. I'm not sure what MicroSol is, but the smell is familiar, too. Waiting to convince my wife that use of her lab for my personal curiosity isn't a misuse of government funds. — GenX_VintageRacing
Well, first off - you're not wrong. There's generally a good level of cussing involved in the process. LOL
That said, back in September, Diecast Racing Report's "Quick Tips" was all about decals... Maybe you could find something there that helps: issuu.com/diecastracingreport/docs/drr-2020-09-01/16
Personally, I find ample application of MicroSet and MicroSol helps make things less miserable.
I want to give a quick update on my personal waterslide decal process (frustrations). Using the method I described in my earlier post, I was having issues with the decals actually setting too fast! This has caused a few decals being off center, or I would push too hard after it was setting and ruin the decal. So I decided to buy the decal setting solutions suggested by a few others.
In my personal experience, these solutions are definitely helpful, but I'm not entirely convinced they are necessary. At least if you're only doing small decals on mostly flat surfaces. I have yet to try a large full body decal that crosses car panel seams.
My biggest issue is that I rush the process too often and don't wait long enough for things to dry. Then I've been spraying too many heavy layers of clear top coat to try and hide the decal edges. It helps, but then it takes over a week to cure properly. So plan accordingly in your build process if you're working with a tournament deadline. Patience is key! :D
- I'm pretty sure, based on smell alone, that Micro Set is just white vinegar. — GenX_VintageRacing
Are there any laserjet sticker sheets that can look (as) good?