
Customizing for the Average Joe
Over the last few months I've received some much-appreciated feedback on my customs, and I thought I'd share how an amateur like me can do a half decent (just above mediocre) job with custom paint schemes. If you're looking for "pro" tips on how to win competitions, or if you're looking to learn how to build fast cars, this is NOT the article for you. However, if you're dipping your toes in the custom scene, or you've started modding and want to send in a car with a unique paint scheme, hopefully you'll find this helpful.
Raising a car from the dead
Before March of 2020 I hadn't even considered repainting a diecast car, let alone cracking one open. The idea was just foreign, and at first a little intimidating (fear of the unknown?). After watching several youtube videos I was inspired to restore my favorite '57 Chevy from my collection. I failed to get a "before" shot, but I'm referring to this one:
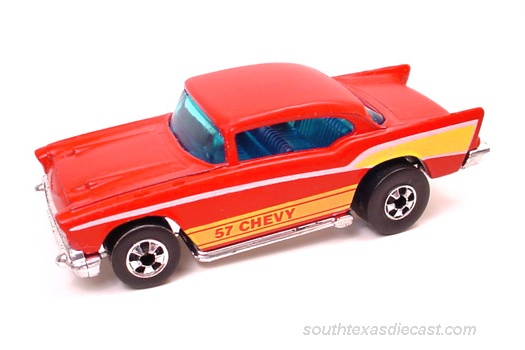
It was pretty beat up, with lots of scratches, and hardly any of the yellow remained on the sides. The bottom was almost entirely black (either from something being spilled on it or just weathering). The wheels were pretty shoddy, the windshield was in rough shape, and a small part of the rear fender was chipped. I mean, the thing was 30+ years old! I quickly realized the level of restoration I wanted meant its racing days were over, as I intended on giving it real riders and a place of honor on my desk.
Like many folks (I assume), I took to YouTube to learn how to disassemble a car (Diecast Graveyard if memory serves) and made a list of some basic things I thought I'd need:
- Drill w/ 7/64 bit
- Spray Paint (basic stuff from Lowe's)
- Paint Markers (cheap ones I found on amazon)
- Paint Stripper (I went with the citristrip gel after watching a few videos about it being less caustic and smelly)
So my method began with carefully drilling out the posts. For the first few months I tapped the holes and used screws, but I quickly found it's often not necessary. My method now typically involves carefully drilling out just enough of the post so I can unsnap the base, and more often than not it all snaps back together at the end. For the cars I intend to race, or the ones that need a little more snap, I use a dab of gorilla glue (the gel) in the the post / post hole after reassembly.
I ended up having to wait weeks (I think it was actually months) for the real riders to arrive, so while the '57 was the first custom I started, this Ferrari Testarossa was actually the first one I finished.

I've been asked several times if I airbrush. While I did just get an airbrush, I haven't yet had time to break it out and use it, so everything up to now has been rattle cans & paint markers.
I did learn through trial and error that it's easy to put the spray paint on too quickly and too thick. I think I painted the '57 four times before ultimately using a paint marker b/c I kept getting drips.
Slow and steady
We've now arrived at the single greatest point of advice I think I can offer for a new customizer: take your time!
In order to get good finishes with rattle cans, it regularly takes me a couple days to finish the body of a vehicle. I typically start with a very fine initial layer, just enough to get paint to metal (I've used primer a couple times, and aside from losing detail, I haven't noticed any benefit...nowadays I typically get a combo paint & primer can, though these do seem to clog quickly).
I will let a layer of paint dry for several hours (or a full day if the weather is cold and wet) before applying another. Once I'm satisfied with the body, I typically let the paint cure/dry/off-gas for a full day before doing anything else (such as a glossy clearcoat, but I've more or less abandoned that at this point due to the risk of destroying your work so far). At the same time I'm painting the body, I typically paint the base & interior separately (either spray paint or paint marker...the latter is usually helped with a white primer on plastic).
Taking a step back, I realize I forgot to mention how I prep the metal and plastic pieces. After stripping the paint from metal parts, I typically polish (both with a dremel & by hand). Recently I've also started sanding before polishing, and that really seems to help get that shiny finish (just use a fine grit). For plastic parts I usually just go straight to paint, though if your'e using water soluble paint markers, a white primer really helps (as mentioned above). On the '57, the windshield was particularly dirty, so I tossed that into another plastic food container and sprayed it with oven cleaner (it did help a bit, but not nearly as much as I'd hoped).
Once I got the wheels for my '57, I assembled and added details with paint markers (though it's not necessary to get a good looking car).
Finally, if you're looking to show off your work, take your photos outside in natural light. IMO it's the cheapest way to really improve the look. Also, don't forget about the photo editing options in whatever you happen to be using, balancing the brightness, color, and pop go a long way as well.

I realize I've probably left a lot out, so if you have questions about my process, please feel free to ask!
If you'd like to see more of my work, please check out my facebook page: www.facebook.com/indianadiecastracing
Discussion
Dude, that's sweet. Wish you had a 'before' picture ........ would've liked seeing where it came from to where it is now. Love the new look and the RIders look great on it!
- me too, but trust me, it was pretty rough! — IndianaDiecastRacing
- before are always good, if i don't pic it early I don't realize how good they look after — dr_dodge
So the bigger tires fit on the front or did you have to modify the wheej wells? I love the 57 but I wish it came with a bigger tire like the big air bel air. That small tire makes it look off.
- the rear tires are too tight to really roll, but I intended it to be a shelf sitter, so no biggie — IndianaDiecastRacing
Great article! Does that stripper work well for you? I have been using Kwik-strip and sometimes it works great and sometimes it just can't do the job.
- thanks! yes, it works really well.....I typically leave the cars in it for about a day and use a brass brush to clean up any problem spots — IndianaDiecastRacing
- The Rustoleum Aircraft Remover is a GREAT stripper that cleans a car in under 15 minutes. Heavy duty stuff but works great. — redlinederby
Everyone, you can see some recent photos by IDR on his profile page, and also the Photo Gallery is usually adorned with his customs as well.
Awesome guide and story, thanks for sharing!
I too just got myself a airbrush...it's something I've wanted for years even before I was doing cars. I managed to get a cheap $50 one that does work surprisingly well, however, I'm finding the process becomes twice as complicated. I thought it would be nice to be able to spray cars in the house rather than always outside with spray cans but the result seems lesser.
I'm still playing and learning but I fear I might just go back to spray cans...just quicker/easier. Althought I never thought of the paint markers! A nice and easy way to get some details without having to mask and repaint and whatever.
I'm encouraged knowing that your process involves simple spray cans rather than airbrushing or other "fancy" tools. The true key is just taking your time and don't rush it.
- thanks! if there's one big takeaway from this, it's that you don't need a bunch of fancy stuff to get decent results! — IndianaDiecastRacing
Since you are just using your off-the-shelf spray paint...are you using the average "it can paint anything" spray paint from like Home Depot or do you typically look at more of the "made for auto" cans? Or maybe you use the smaller, model spray paints?
I know they'll all pretty much work on our cars, just wondering what your go-to is...and maybe more so, have you come across some that you feel just don't work well.
- I've used that rust oleum from Walmart. gives a nice even coat. — CrazyEights
- I like the rustoleum brand, especially for the metal colors (gold, silver, bronze). The Krylon Color Maxx is awful....every can I bought clogs almost immediately. — IndianaDiecastRacing
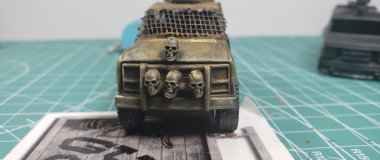
My specialty is rat trucks and battle coupes...either patinaed or beat up, but still able to roll!!! Like a Mazda Repu I did that has a .22 bullet casing, coming out of the back window, made to look like diesel exhaust!!! It sits low, rolls killer and looks amazing!!! Like your Chevy boss...keep em coming!
- Wait until you see my ‘55 Chevy for the Rookie Rally. — SpyDude
- Not sure we're going to enter that yet.. — KPS_Kustomz
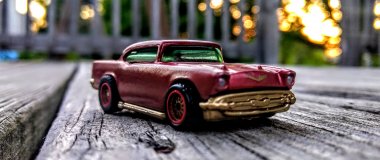
 wanted to share what's possible with minimal effort....nothing but 3 cans of spray paint.... didn't even bother stripping
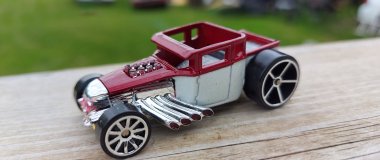
This is my latest attempt. Nothing but a little white primer, ink pens, and a dremel.

Oven cleaner is also good for stripping chrome from plastic parts. Put the part inside a plastic bag, spray it good with cleaner, let it sit for five minutes, then scrub it with an old toothbrush. For a rinse, just dunk it in a jar of water.
- 409 surface cleaner will take chrome completely off in about 3 minutes by submerging the chrome in it, and it's not toxic to skin, etc. — GenX_VintageRacing
- Check out the article in the Feb issue of DRR in which our resident Forensic Chemist tested myriad ways to get chrome off Hot Wheels parts. https://issuu.com/diecastracingreport/docs/drr-2021-02-05-final — GenX_VintageRacing
- My personal choice is an overnight dip in a jar of Windex — Touko
- @ALL: Thank you for the responses! Sometimes I want to strip the chrome or gold off the bases, but only used the Easy Off oven cleaner. Now I have a few more products for my arsenal. — SpyDude
Yo got an interesting tip for those using CitriStrip, which for those not in the know is a brand of paint stripper, and trying to conserve it a little bit:
I saw this from a karmann ghia restoration video on YT so I thought to try it out.
get yoself some plastic wrap.
no ????. Apply the citristrip to the car you wanna paint atrip, then plastic wrap the car while the citristrip is on the paint.
i promise you, every car I've done this on has had its paint peeling off without worry. Old, new, so far? it works. Will update if I find anything that it doesn't work on though.
- I usually dunk my car in a spaghetti sauce jar half filled with CitriStrip overnight. When I get up the next morning, I hang the car on a hook inside the bottle and let gravity drip off the paint and remover. A quick shot with the garden hose cleans up everything nicely. — SpyDude
- That’s a method too but what I’ve learned is that uses a LOT of citristrip up, and while sure, you can reuse it, its still a lot that inevitably goes down the drain, along with some cash in your pockets, if you catch my drift. This method helps reduce some of the material cost of the hobby by quite a bit, seeing as how paint stripper is so costly. — 0utsiders_Street_Racing
Right on. That 57 came out great!