
Best way to build a downhill slope
I'm hoping to rework my track this summer and am thinking about making a sloped track a la pinewood derby rather than a straight downhill. It wouldn't be one long, continuous slope...just the initial downhill into the longer straight like normal.
Just wondering about ways to create that slope and still have it be sturdy without any give or wobble. And moreso, a method that lends itself to all lanes being even on the slope.
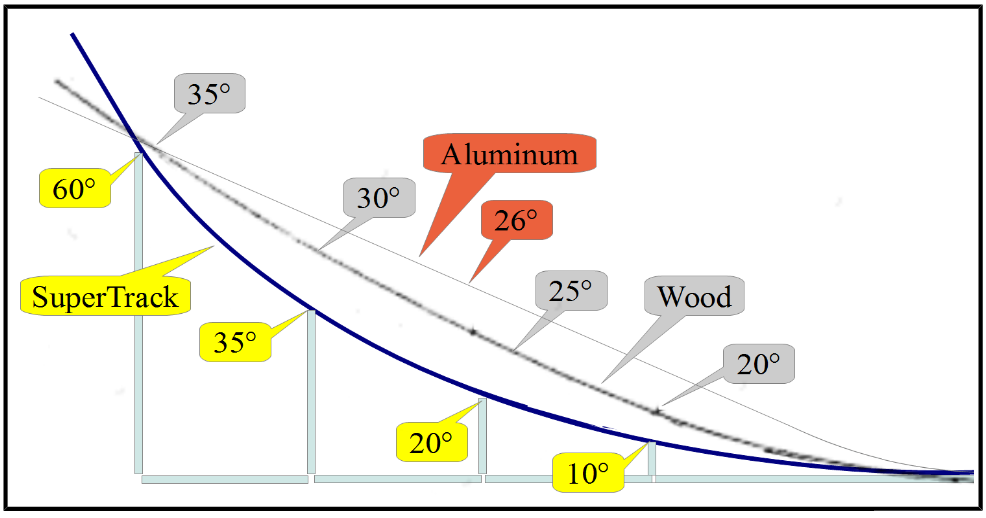
Here's an example I found out there...the blue line is what I'm after, just scaled down to a shorter distance.
I know thinner plywoods will have a natural bow to them but (without any testing) I'm expecting that for the short distance I need, any natural bowing in the wood will be less than I want. The doodle in my brain right now is using the plywood but some bungies or something that would pull down the board until it has the slope I'm after. But I'm guessing there are a host of issues with that idea...I just dunno yet.
If you have experience making such a sloped track or otherwise just have ideas on how to execute, please share your thoughts. Or if you see any possible problems with what I'm thinking, please call it out. Any time/effort I can save, the better.


Discussion
You Bulid your frame and then when you screw the thin plywood to the 2x4's...just like pictured above....your frame is the struture underneath the slope in the above pic....build something similar and screw the slope to the frame.
- I'd have to cut the tops of the 2x4 at angles, right? That's the stuff that worries me... — redlinederby
- Not as hard as it sounds...you can use string along the sides of the 2x4's aka a template...mark the boards where the string is making the slope...remove string and cut your boards — LeagueofSpeed
You could consider various types and thicknesses of sheet plastic that are just right bendable, yet sturdy. Sheets are typically 4'x8' and they can be cut to whatever width you prefer. We actually did what you're thinking before we found the DragTracks systems we use for our races. Those long orange plastic pieces we set between the two tracks were our test pieces.
If you could just find a local wholesale supplier they sometimes have lengths left over from big jobs that might fit the bill and are priced right. But where can you find such a local wholesale supplier?
I got u bro. Just talk to Uncle Bruno if you want to look into that option.
OSD board is strong & flexible
Used it on Htown Hustle for initial transition.
 I used this PVC fake wood plank. It worked very well.
 Just a thought, but what if you put thick-walled PVC pipe on top of the 2x4, then the curved board could touch it at any angle you want? You could also cut or sand the 2x4 to be rounded on the end and not have to worry about the angle.
For the curve, I would use something called Hardboard. It's thin, strong, pretty flexible, available at HomeDepot/Lowes, and it's dirt cheap.
I agree with the others that suggested the PVC/composite boards. You can get 16-18 ft boards in 1x4, 1x6, 1x8. Yes, it can be pricey but Home Depot has a brand that's cheaper than the name brand. Set one end at the high point and the other end on your shelf (if your going shelf mount). It should provide its own natural bow. Whether or not it's close to what you're looking for you'll have to decide. It won't cost you anything to experiment with a board at the store. Then just cut your various height 2x4's to fit the slope and screw them into place.
Hardboard/Masonite and the plastic sheets are pretty flexible but with usually only an 8' to 10' length it can be more work trying to maintain the slope if it's pieced in the middle.
I have quite a bit of experience in doing what you are suggesting and am happy to inform you that it is actually pretty easy with the right materials and techniques.
I used the following techniques for guitar and furniture making, though some of the techniques were inspired by ship building. Often those trades need extremely accurate and repeatable bends and specialized forms to achieve them but the principles are centered around either water and heat or pressure over time.
First, you will want solid wood pieces and not anything laminated or layered like plywood. True those can be bent but more often the lamination glue and the grain crossing will be more hassle than it's worth even at 1/8" thickness. Because solid wood (also called dimensional) features grain and wood fibers all aligned each contributes to a permanent alteration that doesn't have lumps or uneven areas but rather a flat, true and gentle curve. Look for straight grain and pay close attention to the end grain (rings) of any piece you wish to bend to avoid cupping or twisting during drying.
Rehydration and then controlled drying is where most problems show up and to combat them you need to balance your efforts. Try a combination of the following methods for wet bends:
Soak the wood completely submerged for up to a full day. I had good results with using the bathtub until I got married and that became a no-no. For this several weights are required along with something to hold it down flat so that buoyancy doesn't allow unsecured areas from bending up on their own. Once the water has had time to permeate completely the wood is ready for the next important element, heat.
For heat as I mentioned earlier you can use something as simple as a heat gun or as complex as heated metal cylinders which the wood feeds through creating curves as it super heats the water to steam. I made several jigs with electrically heated elements inside black steel pipes stood upright which could be slid to control how much bend I got each pass. This will have a learning curve based on the species, thickness and grain direction so test with smaller longer strips before trying your final piece. The wood should feel almost dry when you are finished. Think about boiling noodles here and imagine needing to soften, shape and then dehydrate again to lock in a new shape.
The next technique is pressure over time BUT that time can be shortened if you combine water and heat methods above. The simplicity here is that the entire curve is applied at once and will give you the desired shape more consistently. Simply support each end above the ground and place a weight in the shaped of the desired curve on the "bridge". Gradually the natural aspiration of the wood through daily humidity changes will curve the piece. Wetting down the wood and applying heat via heat gun while also increasing the weight will speed up the process. This gradual approach was used often in guitar making/repair to correct years of improper storage that led to warped necks and fretboards and could be used given enough time to straighten without pulling frets or edge binding.
Lastly, a little homework in overbending with serve you greatly. In essence, you want to bend the wood beyond the shape needed, dry as thoroughly as you can and then mount without completely binding it in all directions to allow for spring back when the wood finishes drying completely. Mileage will vary but for the bends needed for transitions under diecast tracks over bending can be a ballpark estimate. If you need a 12" radius transition, Try bending the piece with help of an 11" cylinder as the weight. Post bending spring back should give you roughly 12" given a 5/8" thickness straight grain piece of birch, fir or sycamore.
This solution worked well for me.
www.redlinederby.com/topic/sorting-my-transition-out-with-lego/4404
Just an Idea,why not consider the corragated plastic boards.The type signs and such are made from.It will bend like you wish and is still sturdy with little support.