
How to take apart Hot Wheels diecast cars
Update
Please read this updated article thread for continuing discussion about taking apart and putting back together Hot Wheels cars.
Taking apart your Hot Wheels cars with minimal destruction is pretty easy. Sure, throwing them against the wall like we did when we were kids is more fun but they’re a lot harder to put together afterwords. Now all you need is a drill and a few select bit sizes.
Most Hot Wheels and other 1:64 diecasts have two rivet posts that hold the metal body to the plastic chassis. The rivets are sort of like pop-rivets in that their head is just stamped and folder over. This means there is no screw for easily disassembly. Instead you must drill out the rivet head along with some fine grinding.
Drilling out the rivets
I usually start with a 1/16 drill bit and drill down into the middle of the rivet on the underside of the car. This is your guide hole for the larger bit, so you don't need to drill down very far.
Next you'll use in a 3/16 bit. It's important to note that your bit be designed for drilling metal. General purpose bits won't last very long. In general, we want to grind the rivet head away so we don’t want a bit that has too much of a point. If your bit tip is too pointy you’ll do nothing more than push the rivet head even wider, which doesn’t make disassembly any easier. I bought a Milwaukee 3/16 bit designed for metal and it works great – it was only $2 at Home Depot. It has less point than others I tried.
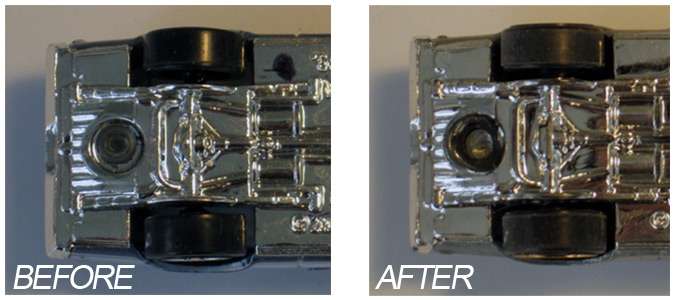
When drilling, make sure you are going down on the rivet as even as possible. If you drill at an angle or off-center you’ll get an uneven grind. You will also have to grind through a bit of the plastic. Don’t apply pressure too hard too soon, you’re not drilling into concrete. Check your rivet every few seconds to see how much farther you have to go and stop when you see the black plastic showing through.
Once you’ve reached plastic drill very slowly. You may have to angle your drilling to get some of the edge metal left over from the rivet. At this point you can also whip out your Dremel with a small grinding bit and remove whatever metal is left over.
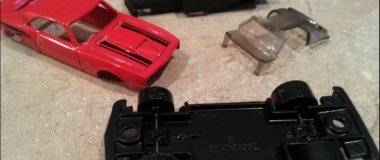
Parts of a diecast car
After you’ve drilled out the rivet head you should be able to separate the body from the chassis pretty easily. Don’t force it if it’s not separating. Use your needle-nose pliers to get some leverage but you don’t want to bend/break the plastic or metal – especially the axle.
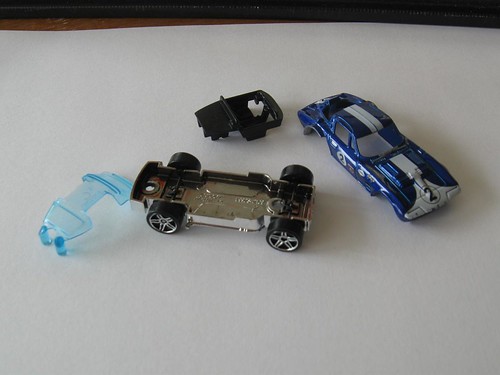
Once apart you’ll usually be left with the four parts that make up a car – the metal body, plastic chassis, plastic windows, and plastic interior. You’re now ready to customize and paint the car as you see fit.
Putting your car back together
After you're done customizing your car, it's time to put things back together so you can start racing. Assembly is quite a bit easier than taking the car apart. Just put the car parts back together the way they came apart and you should see the rivet posts showing in the hole you created on the bottom.
From here you can experiment with compounds to "glue" things back together but I've been using JB Weld epoxy for years with great results. JB Weld requires that you mix two parts together to create a steel-strong paste. You don't need much so one tube goes a long way. Take your epoxy and use a toothpick to put it inside the rivet hole you drilled...maybe give it a little "head" so it's even strong. Wait maybe 10-minutes and you're done. Your car will be as strong as it was when it came out of the blister, only now it'll be your own custom racer.
Discussion
Great question, otp1! It really depends on what the chassis is like, and wether it is metal or plastic. Everyone does it a little differently. If it is a plastic chassis, I use a pair of needle nose pliers to snap the tabs off that hold the axles onto the chassis. If it is a metal chassis, I use the dremel to carefully cut off the tabs. Good luck, and build on!
I have a small knife and a small Stanley screw driver, I try and pry the prongs apart enough to slip the axle out...some metal bases lock the axle in at the bottom of a deep channel, I snap these bases apart, sometimes that releases the axle, others just giving me a chance to get at the prongs with a clock maker's file...
on a plastic base sometimes I use the knife to cut off the prongs...
if you know what width and diameter axles you want, try and get them from a plastic base... bent axle FTEs are a real bummer...
Just starting to dip my toes in this fun hobby. If you snap the tabs that hold the axle in place, how do you get the swapped tires to remain in place. Probably an obvious answer, but not one I know.
Thanks.
- Foreman ( formerly model40fan) has a post regarding this. search the site database for jb rivet. very helpful! — CrzyTrkrDude
- dang autocorrect. FORDMAN — CrzyTrkrDude
- well, i am the foreman at my house ! — fordman
- Will do, thanks. — Finkle_and_Sons
Check out this great most from RLD member Chris...lots of photos on the basics of modding. A good place to start and explore from there.
http://www.redlinederby.com/topic/super-simple-68-camaro-mod/2150
When I built my track I had no idea that I would be looking at modifying a car but I bought a bunch of racing champions NASCARs for the kids to race and some of them the wheels and axels are so bad they don't even turn. Is it easier to swap bodies with the donor car and keep the whole chassis with axles and wheels or swap the axles into the old chassis?
I think adding new axles to an existing car is easier. Less worry about matching body and chassis. Remove the bad wheels, find a donor FTE car and out those in the car body you want to race. Often you won't even have to trim the donor axle if it's close enough.
I have compiled an extensive range of guides showing everything from the basic wheel swap to custom making parts from scratch ... and everything in between.
I also recently posted a video showing how I take apart a hot wheels car and do a wheelswap without breaking anything and without the need for screws or glue to get it back together.
Check out the specific guide here -> http://mycustomhotwheels.com/how-to-customize-hot-wheels-wheelswap/
- I also invite you to take a look through the extensive how to guides,
- Catch up on 'life on the shelf' - a catalogue of the comings and goings from my diorama shelf
- Enjoy the best of the web as I bring you 'Your Custom Hotwheels' - a showcasing of the best customs from Instagram and Facebook each fortnight.
- Or simply enjoy the portfolio of work that is MY CUSTOM HOTWHEELS
- And, I'd like to welcome you to join in the fun here...lots of racing going on! — 72_Chevy_C10
- see you in lane two ! — fordman
- I have visited your site is feral times. Good stuff. Hope you can join us for a race sometime — Steele_Mill_Racing
- This is an amazing site with tons of good information! OMG, I just spent two hours on it! — SpyDude
What's the easy way to get the axel out without bending and to swap out as in reconnect the axel